How to Build a Preset in Line 6 Helix Stadium: What to Tweak, and in What Order
- Noise Harmony

- 12 minutes ago
- 9 min read
Most people get stuck building a Line 6 Helix Stadium preset for the same reason: they open an empty chain and don't know where to start or what to touch next. You're looking at amps, cabs, effects and a few hundred parameters, and it's easy to burn an hour chasing settings you copied from a forum. This guide walks through that order, block by block, and explains the reasoning behind each step, so you can build any tone you want instead of memorizing random parameter values.

Note: This post contains affiliate links. If you choose to buy through them, I'll get a small kickback, at no extra cost to you. It helps me keep Noise Harmony going. Thank you!
Table of contents
Start with the amp and cab foundation
Every good tone starts at the amp. The way the amp, the cabinet and the mic in front of it interact decides most of what comes out of the Stadium, and everything you add later only shapes that core. That's why it goes first. Build on a shaky foundation and no amount of EQ or effects will rescue it.
So before you load anything, get a rough idea of the sound you're chasing. Somewhere clean, right up at high gain, or anywhere in between. You don't need the exact tone in your head, just the general territory, because that tells you which amp to reach for. Line 6 lists the full model set on their site, and it's deep, so whatever classic you've always wanted to play through is likely in there. If you want a Marshall-style crunch, for example, the Brit 2203MV is modeled on the JCM-800.
One thing worth knowing while you browse. The models at the very top of the list, above that subtle grey line, are the new Agoura amps. These are Line 6's latest models, separate from the HX and legacy amps you might know from older Helix units, and the collection keeps growing with firmware updates. They feel exceptionally good under the fingers, so audition them first.

Trust the auto-assigned cab while you're learning
Load an amp and the Stadium drops a matching cabinet in right behind it, automatically. You can switch that behavior off, but while you're learning, leave it on. Until you've built your own preferences for specific cabs, microphones or impulse responses (the short audio captures that work like a sonic photograph of a real speaker cabinet), the pairing Line 6 chose is a genuinely good place to land.

Then ask yourself one honest question before you touch a single knob: am I even close to the sound I want? Strum a few chords and listen. Sometimes the fastest fix isn't a knob at all, it's swapping to a different amp or cab entirely. Getting the foundation into the right ballpark first saves you a lot of pointless tweaking later. If you'd rather learn by reverse-engineering polished tones, our free Helix Stadium presets are built for exactly that.
Focus View: the fastest way to a usable tone
Once the amp and cab are in, the Stadium has a feature almost made for this moment: Focus View. Tap the Focus View button at the top left of the Inspector to open it.
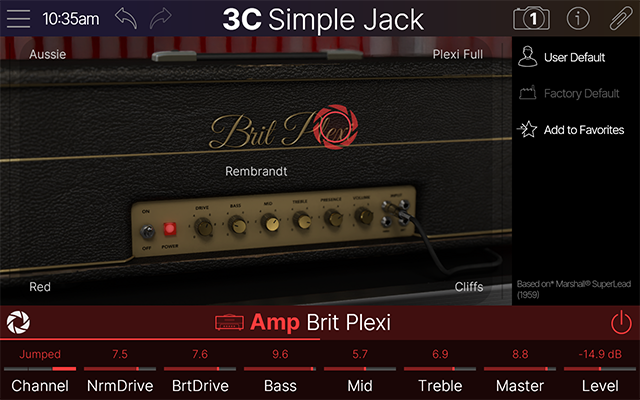
Inside, the amp's parameters are mapped across the screen, to the center and the corners, so you can audition several ready-made tonal variations just by moving around. You land on a strong starting point without needing to understand Sag, Bias or Ripple yet. The cab works the same way. Instead of turning mic-position knobs, you drag the microphone around on screen and hear it move.

This is the single best thing a beginner can lean on. It turns the slowest part of tone-building, the blank-page moment, into a few seconds of exploring.
Set the gain and Hype knob by feel, not by number
With the general direction set, go back into the amp and look at the gain. Don't chase a number. What matters is how it feels to play, and that's personal. One player likes gain at 6, another at 8, and neither is wrong.
Line 6 Helix STADIUM | 24 Presets | "Aura" & "Reflections" [BUNDLE]
€59.98€50.98
Buy Now
Gain does more than add dirt. It changes how the amp responds to your hands. Lower settings stay touch-sensitive and dynamic, where the force of your pick attack really shapes the note. Push the gain up and you trade some of that response for sustain and aggression. Which side of that trade you want depends on how you play, so set it to your hands and ears, not to a value someone posted online.
Next, the Hype knob, a new control on the Stadium's Agoura amps. At zero the amp sits close to its original character. Turn it up and the tone moves toward something more processed and studio-ready, a quick way to make a sound sit better in a mix without reaching for an EQ. A little goes a long way.
Clean up the low and high end with cab cuts
Now tidy the edges, and this happens on the cab block. Set a low cut to roll off the sub-bass a guitar doesn't need. There's no universal number here, because it has to translate on whatever you actually play through, so trust your own playback system.
Then the high cut. Electric guitar throws off a lot of harsh fizz up top, and a high cut tames it. A reliable way to find the spot: overdo it on purpose until the tone goes dull, then pull back until it opens up again. Sneaking up on the right spot from the wrong side makes it obvious.
Shape the voicing with the amp EQ
Back to the amp for the main tone controls: Bass, Mid, Treble and Presence. Treble is the one you'll hear most clearly, since it drives brightness and pick attack, so make small moves and listen between each one.
If you want finer control than four knobs give you, drop a separate EQ block into the chain. An EQ is one of the easiest blocks to read by ear, because you're working with clear frequency bands instead of a single mystery number. With the focus view you can quickly cut and boost frequencies to look for the ones that you don't like in your tone.

The amp also hides deeper parameters like Sag, Ripple and Z PrePost. Those are a rabbit hole for another day. The useful part is that the Stadium prints a short description of every parameter at the top of the screen, so you can read what a control does while you tweak it.
Also check:
Add a boost, then gate the noise
With the core tone sitting right, a boost in front of the amp tightens the low end and pushes the amp a little harder. This is also the perfect moment to meet Model Search, which works for amps, cabs and effects alike.
Type either the Line 6 name or the name of the gear it's based on, and the Stadium finds it instantly. Looking for an Ibanez TS808 Tube Screamer? Type "Ibanez" or "TS808" and there it is.

Once the boost is dialed in, you might hear some pickup noise, depending on your guitar. Easy fix. Tap the Input block at the very start of the chain, enable the noise gate, then raise the threshold while listening to the hiss and stop the moment it disappears. Like the rest of this, set it by ear, not by number.
Please consider subscribing to our YouTube channel, it helps a lot!
Finish with a delay, then save the preset
The last block is a delay, and it's a good place to think about mono versus stereo, because the Stadium marks every effect as one or the other in the list. A mono block sends the same signal to both sides, so you hear it dead center, which is what you want if you play through a single guitar speaker or a mono PA. A stereo block sends different information left and right, so a ping-pong delay on headphones or in-ears throws distinct repeats into each ear. One thing to keep in mind: a mono block placed after a stereo one folds everything back to mono, so watch the order.

Picking the type is the real decision here. After that it's the same by-ear approach as everything else: narrowing the repeats with a touch of low and high cut keeps them from crowding the dry signal, then the mix level sets how much delay you actually hear. If you need some inspiration, listen to our Aura delay and modulation pack.
When the tone is where you want it, save it. Press the floppy-disk Save icon, choose "Save As New," name the preset and confirm. It's worth knowing the other options too. "Save" overwrites the current preset. "Save As New" drops a fresh copy into the next free User Preset slot. "Overwrite" lets you pick which existing preset to replace. "Save Template" stores the whole chain as a reusable starting point, which is handy once you find a signal flow you keep coming back to.

And that's a complete preset, built from an empty chain. There are no hard rules in sound design, and some of the best tones come from breaking convention on purpose. Knowing the fundamentals just gives you a framework, and once you know the framework you can break it on purpose instead of by accident.
The Line 6 Helix Stadium preset build order at a glance
If you take one thing from this, take the order, because it matters more than any single setting. Foundation first, then tone, then effects, then save. Working that way means each decision sits on a stable base instead of fighting the one before it. Here's the whole sequence in one place.
Follow it top to bottom the first few times. After that it stops being a checklist and becomes the way you think about a chain.
Frequently Asked Questions
What order should I build a Helix Stadium preset in?
Work foundation first, then tone, then effects, then save. That means amp and cab, then Focus View to land a starting point, then gain and the Hype knob, then cab low and high cut, then the amp EQ, then a boost and a noise gate, then a delay, and finally "Save As New." Each stage sits on the one before it, so you're never fighting an earlier decision.
What is the Hype knob on the Helix Stadium?
The Hype knob is a new control on Helix Stadium's Agoura amps. At zero the amp keeps its original character, and turning it up moves the tone toward a more processed, studio-ready sound that sits better in a mix. It's a fast way to polish a tone without reaching for an EQ.
What is Focus View and why should beginners use it?
Focus View maps an amp or cab's parameters across the screen so you can audition ready-made tonal variations by moving around, instead of learning every knob first. It's the quickest path from an empty chain to a playable tone, which is exactly what you want early on.
Should I use a mono or stereo delay?
Use a mono delay if you play through a single guitar speaker or a mono PA, since stereo collapses to mono there anyway. Use a stereo delay on headphones, in-ears or a stereo PA where the width actually shows up. Remember that a mono block after a stereo one folds the signal back to mono.
Can a beginner really build a good Helix Stadium preset from scratch?
Yes. The Stadium is built to help, with auto-assigned cabs, Focus View, on-screen parameter descriptions and Model Search all lowering the barrier. Follow the order in this guide, set things by ear instead of by number, and you'll get a playable tone without understanding every parameter first.
Keep building, and watch it in action
That's the whole workflow: amp and cab for the foundation, Focus View for a fast start, gain and Hype for character, EQ and cuts to clean it up, a boost and gate for tightness, a delay to finish, and a clear save. Learn that order once and it works for any tone you want to build on Helix Stadium.
If you'd rather watch it happen than read it, the Noise Harmony YouTube channel runs a Helix Stadium beginner series that walks through the unit from the ground up, and this build order is the backbone of it. When you want sounds worth playing right now, start with our free packs or step up to our premium Helix Stadium presets.




Comments